Webpack: An in-depth introduction to SplitChunksPlugin
Table of Contents
This article has been published on indepth.dev.
Introduction
If the name of this plugin doesn’t sound familiar, it may be due to the fact that it is disguised as the optimization.splitChunks configuration option. If that doesn’t look very familiar either, then you probably haven’t worked on build configuration much. Regardless of whether you have encountered the name of the plugin or not, this article will give you a good introduction to one of the most used plugins in webpack’s ecosystem.
This is a rather complex topic, so this article aims to be a foundation for future articles since it goes over the main building blocks of the plugin, with the help of digestible diagrams and StackBlitz demos.
As we will see, a problem this plugin solves is code duplication, which can lead to redundant content loaded over the network. SplitChunkPlugin is able to figure out, based on some configuration, the modules which are too expensive to be duplicated and then put them in separate chunks so that the considerable efforts of loading large modules are done only once.
A few webpack-related articles that you might find interesting, although they are not required to understand for this write-up:
- An in-depth perspective on webpack’s bundling process
- Demystifying webpack’s ‘import’ function: using dynamic arguments
It is highly recommended to follow along by experimenting on the provided StackBlitz demos.
Let’s get started!
I’ve used lots of StackBlitz examples in this article to demonstrate notions. However, I noticed that files in the node_modules folder don’t persist across page refreshes and since we will need such files in this article, each StackBlitz demo will detail in its readme file the required steps to get the app up and running.
Setting up
In order to get a better understanding of what this plugin is capable of, throughout this article we will be using an example which will undergo, as we go along, different configuration-wise changes that demonstrate this plugin’s features.
Before we introduce the problem this plugin solves, let’s first see the small project along with its configuration which will mark the start of this learning journey:
├── a.js
├── b.js
├── c.js
├── d.js
├── e.js
├── f.js
├── g.js
├── index.js
├── node_modules
│   ├── x.js
│   ├── y.js
│   └── z.js
└── webpack.config.js
This project can be found in this StackBlitz application. Make sure you follow the instructions listed in readme.
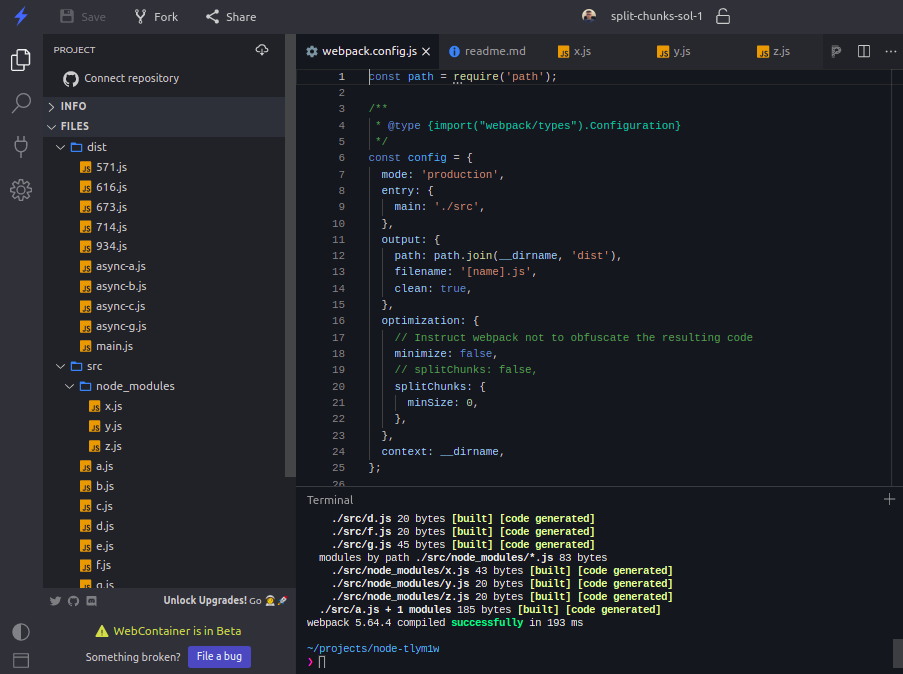
The webpack.config.js file looks as follows:
{
  mode: 'production',
  entry: {
    main: './src',
  },
  output: {
    path: path.join(__dirname, 'dist'),
    filename: '[name].js',
    clean: true,
  },
  optimization: {
    // Instruct webpack not to obfuscate the resulting code
    minimize: false,
    splitChunks: false,
  },
  context: __dirname,
};
After the npm run build has been run in the StackBlitz app, the dist directory should have the following structure:
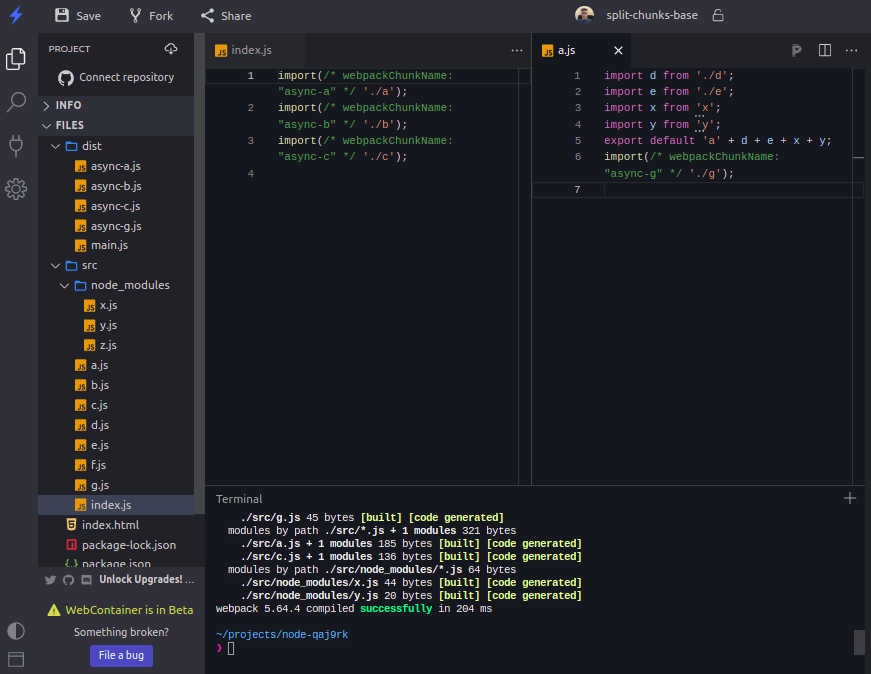
Notice there are 5 chunks, 1 for the single item in the entry object(i.e. main: './src') and 4 chunks that resulted from using the import() function.
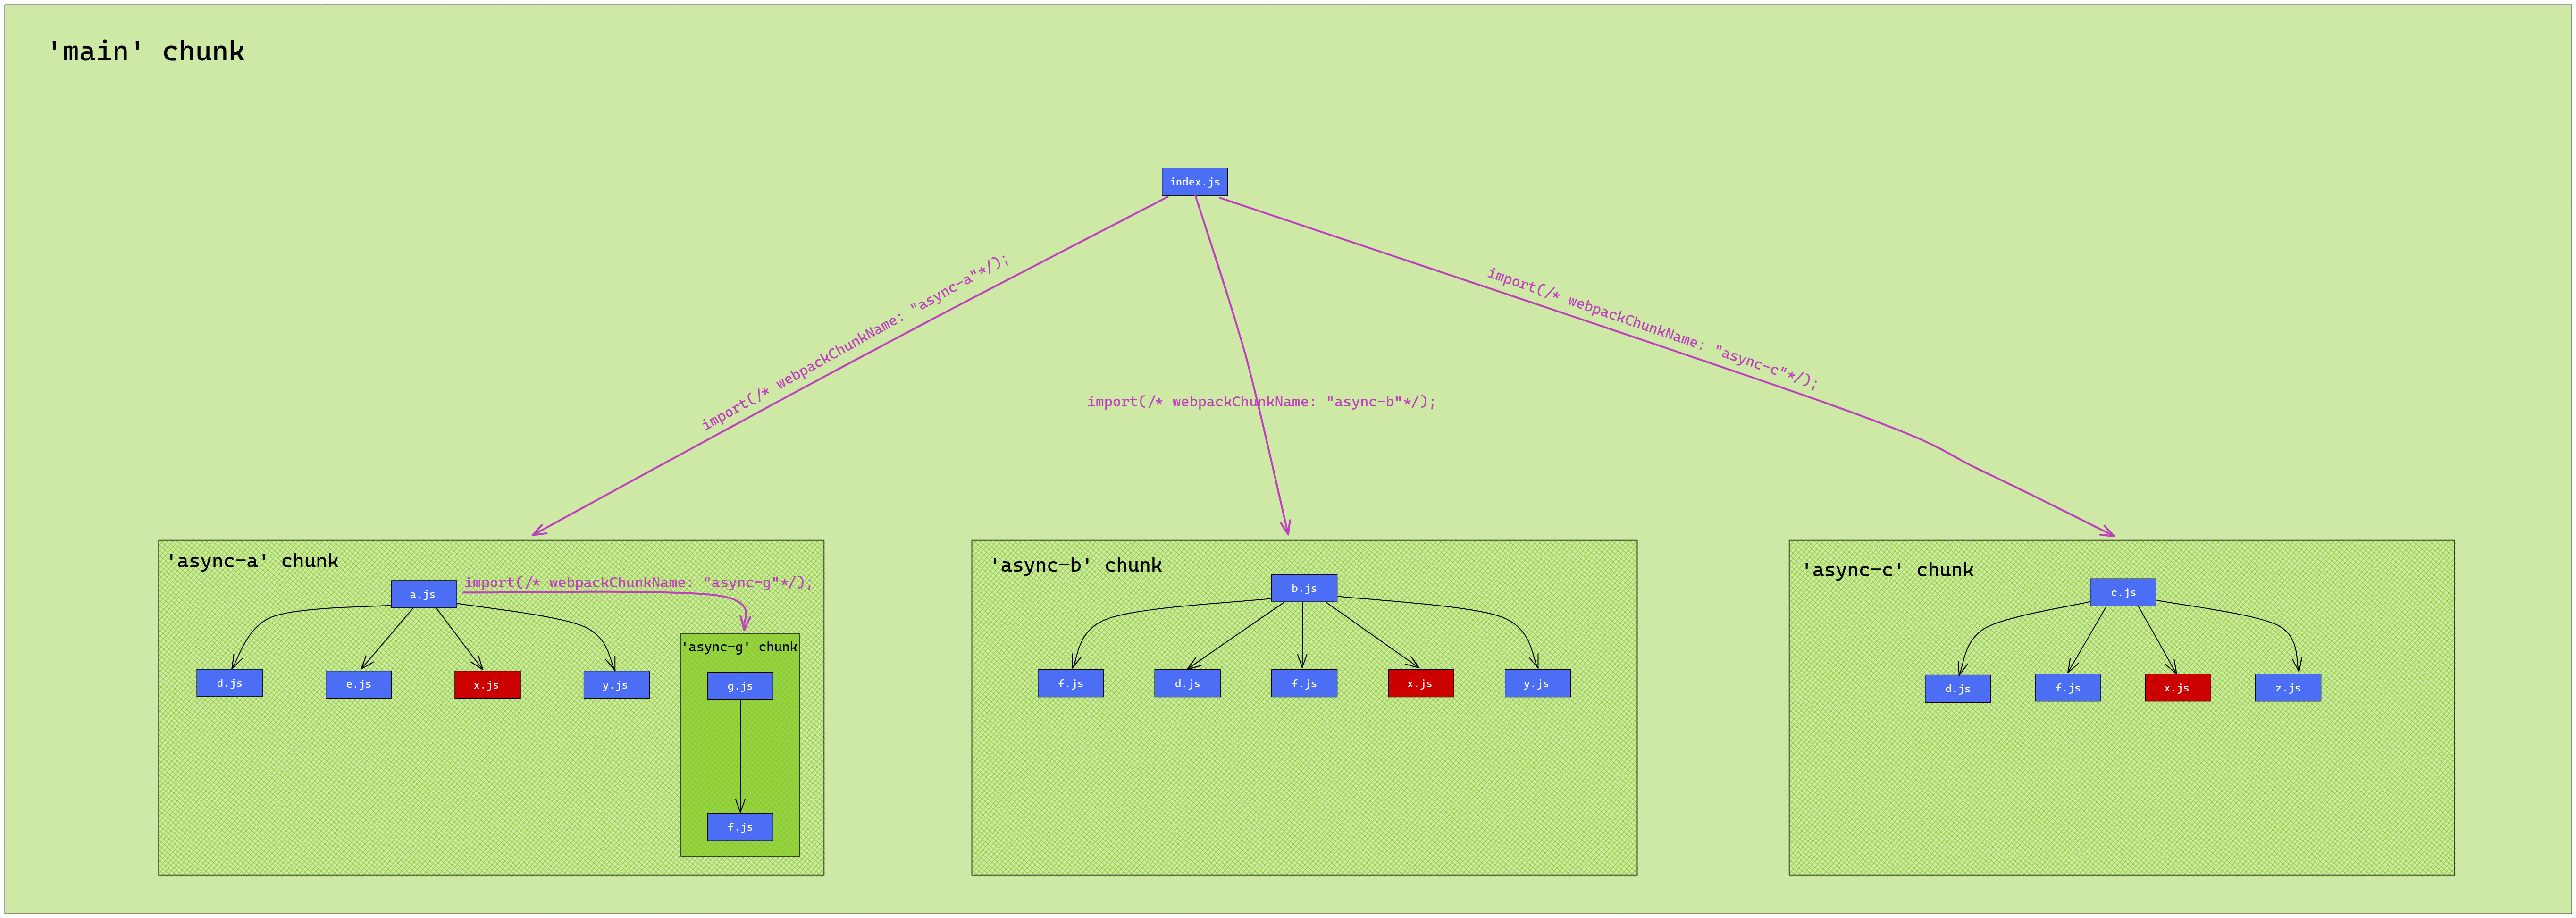
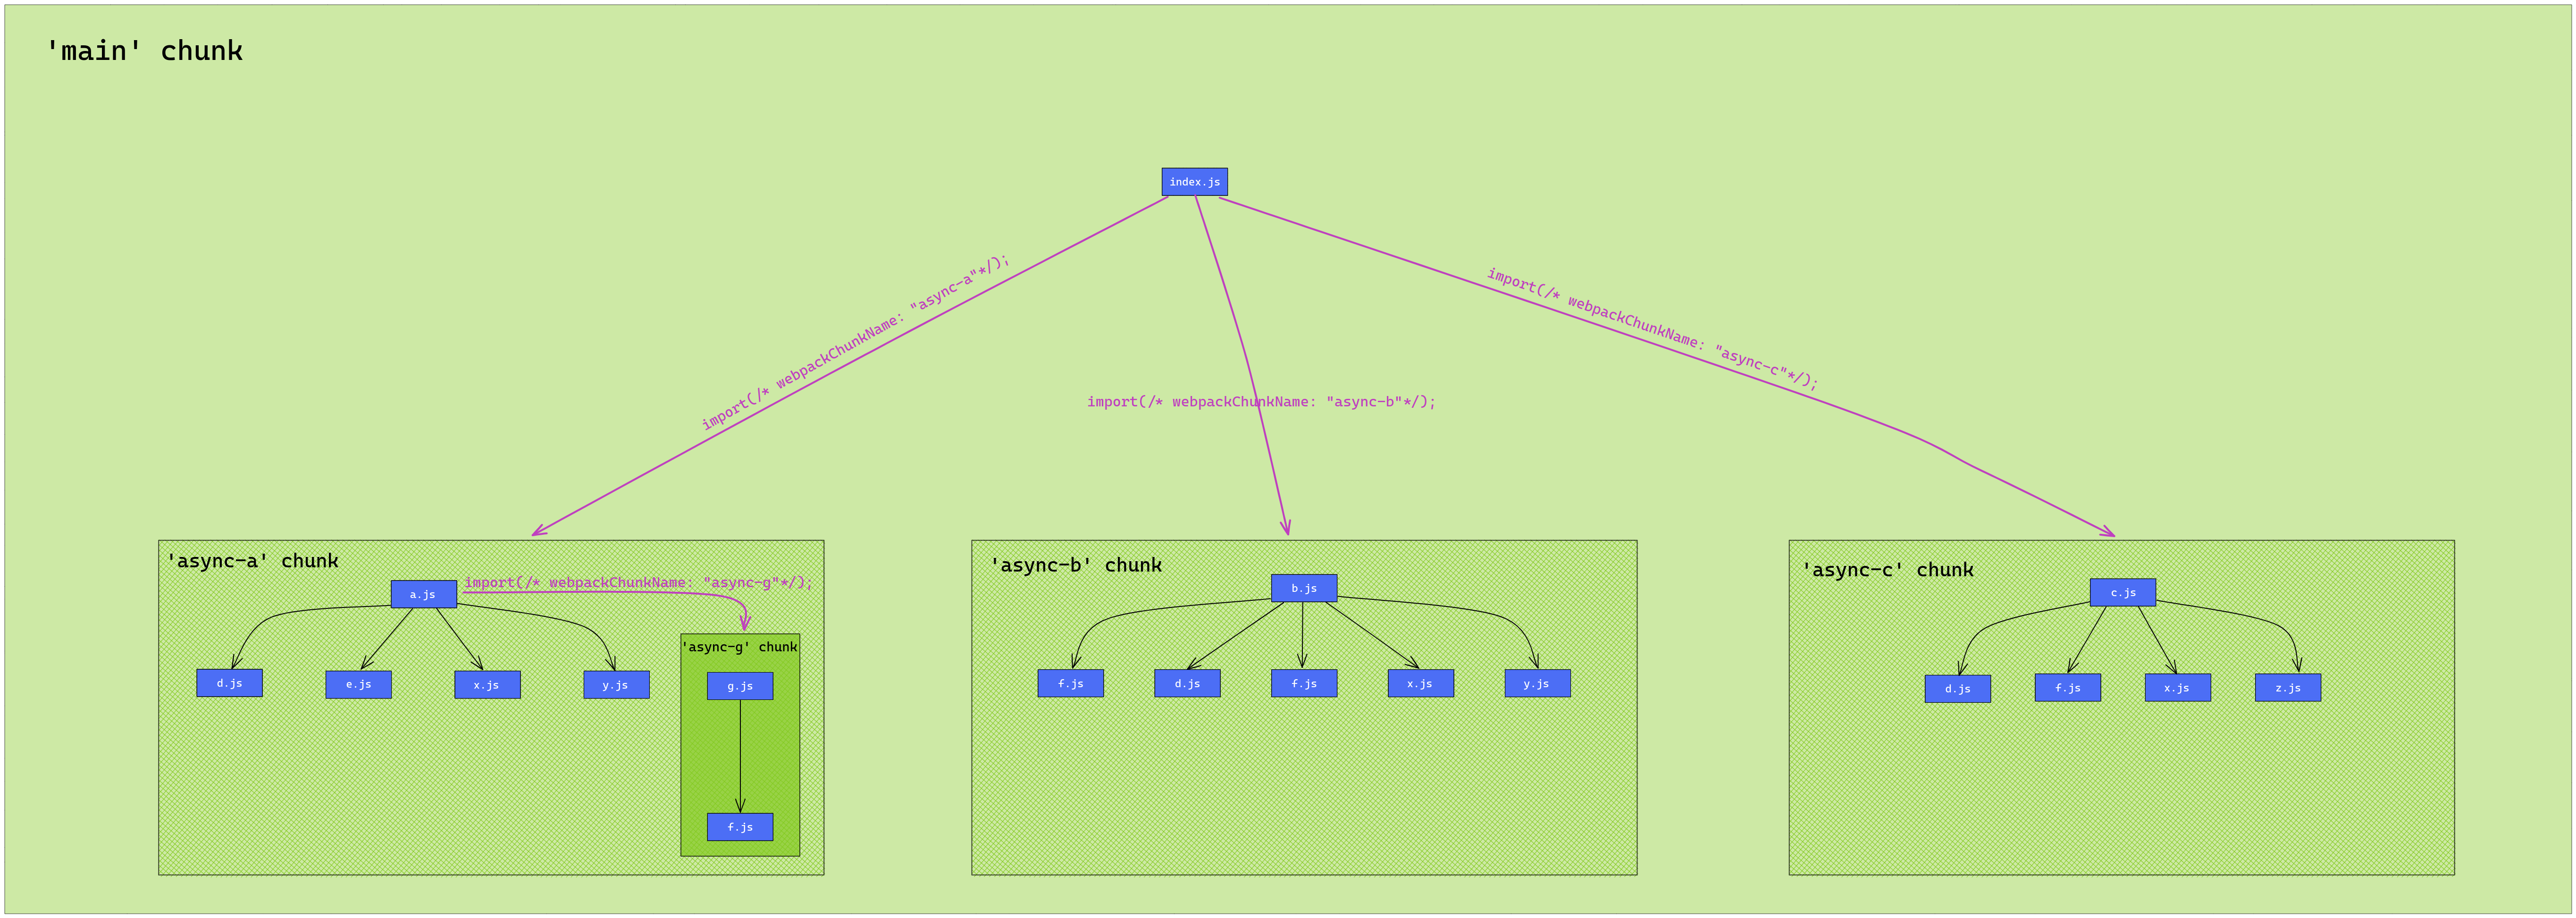
This is a diagram that describes not only the relationship between modules(the dependant and the dependencies), but also the parent-child relationships between chunks:

The link for the above diagram can be found here.
My recommendation would be to open that diagram’s link and try to understand a bit what the diagram illustrates.
The black arrows indicate the use of top level ES module import statements(i.e. import xDefault from 'x'), the purple arrows, as described on the arrows themselves, show the use of the import function(i.e. import(/* webpackChunkName: "async-a" */ './a')) and this has a very important consequence: the creation of new chunks. Last but not least, the chunks are framed in green blocks. The green nested frames indicate a parent-child relationship between chunks.
As in, the main chunk has 3 child chunks: async-a, async-b and async-c. The async-a chunk has a child chunk too, async-g. It is also important to mention that modules(framed in blue) belong only to the chunk described by the chunk’s green frame. So, the g and f modules belong to the async-g chunk.
Now that we have some basic concepts in place, let’s start exploring!
Introducing the problem
Before going any further, I’d recommend you run the project’s build script. Here is once again a link to the StackBlitz app in question. We will use the results yielded in the dist directory in order to make the first steps towards understanding the problem.
Let’s spend a little time on examining the contents of dist. As you can see, there are 5 files, so our project is composed of 5 chunks. The main chunk is literally the main chunk(it can be thought of as the entry point of our app) and this can be noticed from its source code - it contains a lot of webpack’s runtime code which holds the logic for loading other chunks(e.g. via HTTP), for storing the modules and much more. If you peek into the async-* files, you should see that there just a small amount of runtime code required to connect these chunks with the main chunk. Most of the code in an async-*.js file is for the imported modules and the exported members.
Let’s think about this interesting question: how many times do you think the x module(that corresponds to the x.js file and is imported into the a, b and c modules) will be copied in all these 5 resulting files? Feel free to refer to the diagram. In order to find the answer to this question, you can copy the exported string from the x.js file and perform a global search in the StackBlitz app:
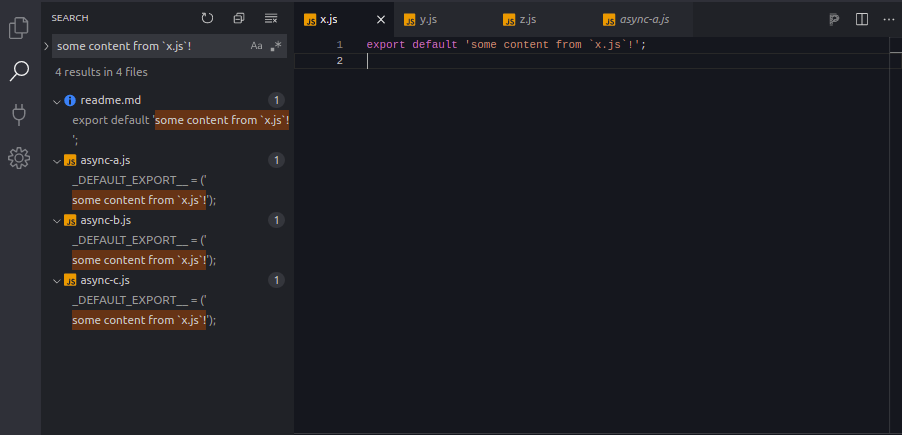
So, we can conclude that the x.js’s content is duplicated 3 times, one time for each importing module that makes a separate async chunk(e.g. the a module which corresponds to the async-a chunk, b to async-b and c to async-c). Imagine now if the x.js file had hundreds of lines of code! All these lines would be copied in 3 different places - this seems like a waste of resources. It’s true that this fact won’t cause the x module to be executed multiple times by webpack, so in the end we will still end up having only one instance of x.js in our app.
However, recall what fetching a chunk implies - an HTTP request. Since x.js’s content is present in 3 chunks, if we first load, let’s say, the async-a chunk, then the entire code that’s in the async-a.js file will have to be downloaded from the network and then parsed. If the x.js file is considerably large, this loading process may take a significant amount of time to complete. Having to go through this lengthy process another 2 times doesn’t look like the best approach we can take, so there must be a better way.
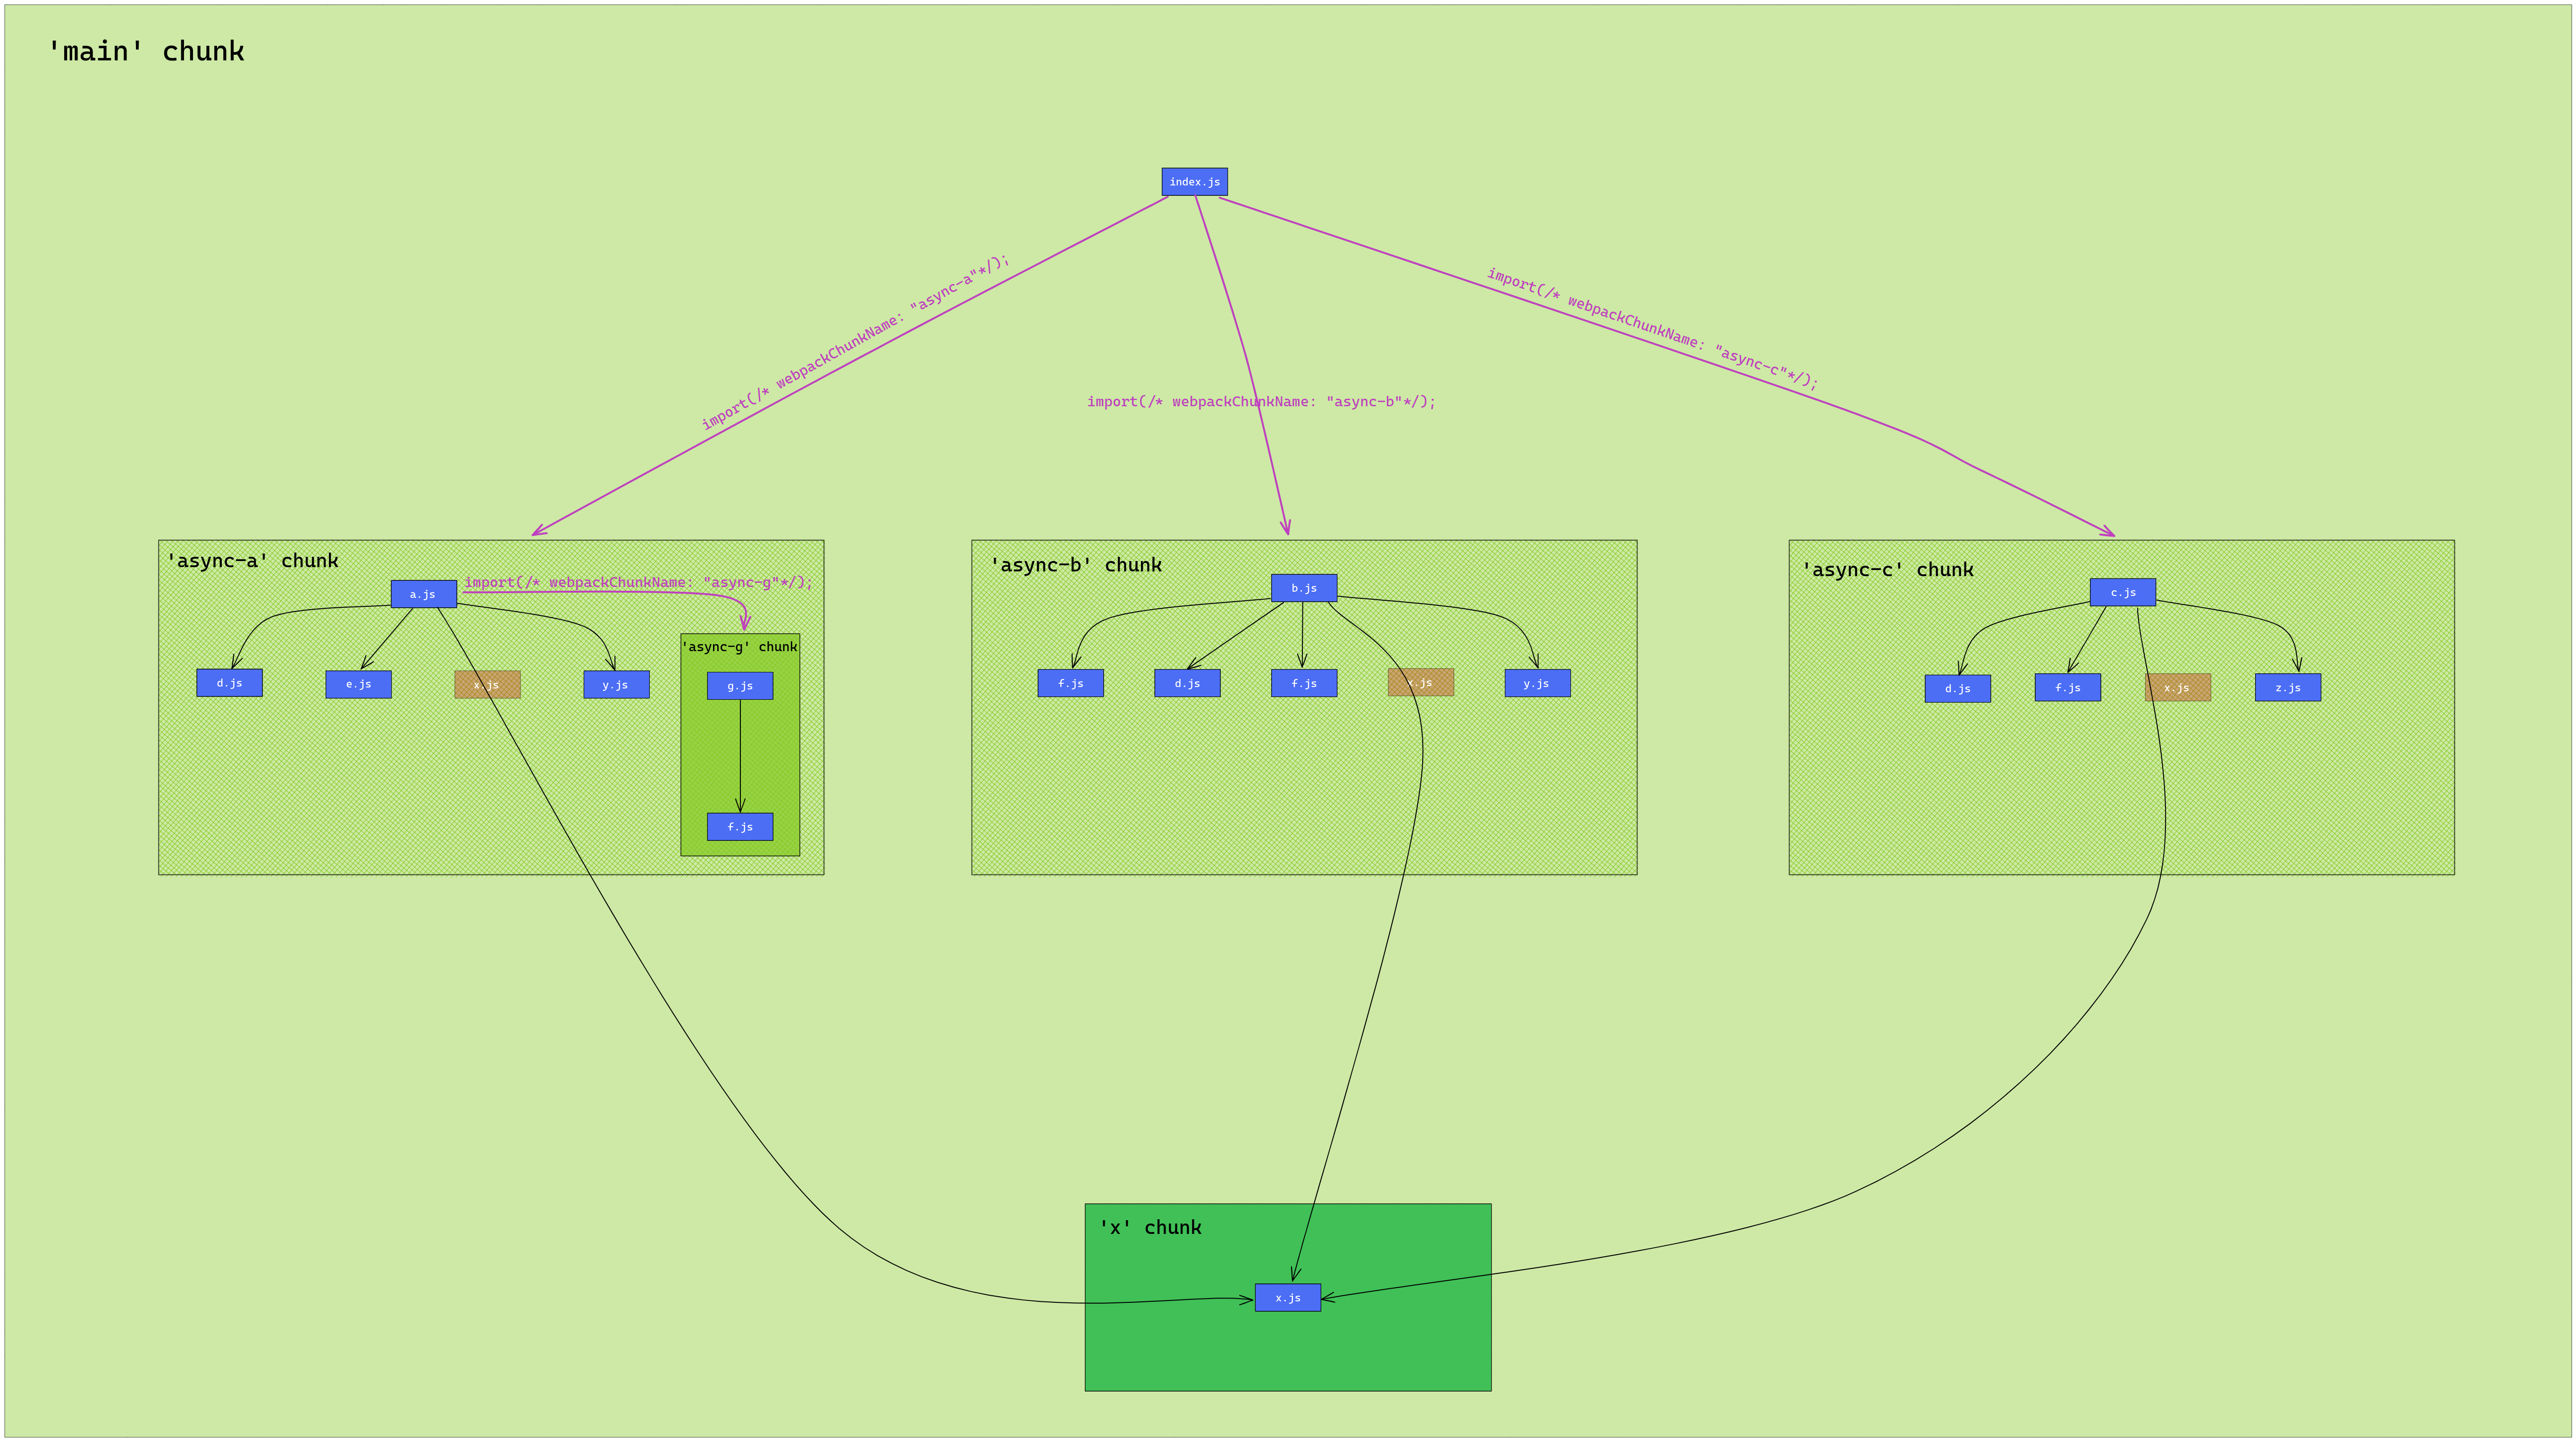
Here’s a way to visualise this problem with the help of a diagram:
A link for the above diagram can be found here.
This diagram is not very different from the first one, since it only highlights the x module in red. This simply indicates that there is something wrong with this module and it will also help us identify what SplitChunksPlugin does in order to solve this problem. This is what the next section is about.
As you might have noticed, it is true that modules such as
f,d,yare in the same situation asx, but we are only focusing onxnow, for simplicity’s sake.
How SplitChunksPlugin solves the problem
I assume you must be anxious to dive deep into the webpack configuration so that we can see what SplitChunksPlugincan do, but let’s first think of how we could solve this problem conceptually. In other words, after consulting the above diagram, how would you optimise the current situation? Supposing that x.js has 1000 lines of code, our app will have to load them 3 times(because x is part of 3 different chunks, each of which being requested via import() from the main chunk). I should also mention that if the same chunk is requested multiple times, only one HTTP request will be made and then its modules will be added to a cache object, such that, on subsequent requests for that chunk, everything will be retrieved directly from that cache object.
Considering the above information, we could load the 1000 lines of code only once by placing the x module in a new chunk. This way, when module x is required by module a, an HTTP request will be made in order to load the chunk in which x resides in(this is because the chunk is loaded for the first time). Then, when module b requires x, those 1000 lines of code won’t be loaded again and x will be retrieved directly from memory. The same happens when the c module requires x.
Let’s see how this solution would look fit in a diagram:
A link for the above diagram can be found here.
The barely visible red rectangles represent the replacements that have been made. Now, because the x module is in a separate chunk, it will be loaded only once across the network, no matter how many times the module is requested. This is what we can achieve by using SplitChunksPlugin.
Now, let’s come back to our favourite part: webpack configuration. This is what the webpack.config.js file should look like in order to activate SplitChunksPlugin with the default options:
{
  mode: 'production',
  entry: {
    main: './src',
  },
  output: {
    path: path.join(__dirname, 'dist'),
    filename: '[name].js',
    clean: true,
  },
  optimization: {
    // Instruct webpack not to obfuscate the resulting code
    minimize: false,

    splitChunks: {
      minSize: 0,
    },
  },
  context: __dirname,
}
This solution can be found in this StackBlitz app(make sure to follow the instructions from the readme file).
The minSize option isn’t very relevant now, but we needed it because the chunk which x belongs to is quite small and webpack would think it’s not worth it creating a new chunk just for a few bytes. So, we’re telling SplitChunksPlugin to create a new chunk if its total number of bytes is greater than or equal to 0.
As a side note, the x module is not the only module which can belong to this new chunk, there can be others too. The grouping criterion is how the modules are used in other chunks. If, for example, besides x, there were a module w used the same as x, then the separate chunk would contain both x and w modules.
The configuration options the SplitChunksPlugin takes in determine how and whether or not new chunks are created. In order for a chunk to be created, it must, first of all, abide by a set of rules which defines a so-called cache group.
For instance, we could say: I’d want chunks to be created only from modules which come from node_modules and the chunks they form must have at least 1000 bytes. We could also enforce the number of existing chunks a module appears in to be at least N. In the example we’ve been following, we could prevent any chunks from being created if the x module does not appear in at least 3 chunks.
All such constraints could define a cache group and only chunks that fulfil all the cache group’s conditions will be created.
In the following sections, we will examine the configuration options that are available for SplitChunksPlugin, starting off with arguably one of the least intuitive of them.
The cacheGroup option
To reiterate what has been mentioned at the end of the previous section, a cache group is described by a set of rules. This set of rules defines the circumstances in which new chunks can be created. Let’s see a rather didactic example of a cache group:
cacheGroupFoo: {
	// The number of chunks the module must appear in
	minChunks: 3,
   	// Number of bytes put in a chunk(i.e. the sum of the number of bytes for each constituent module)
	// For example, if a chunk contains 2 modules, `x` and `w`, then `nrBytesChunk = nrBytes(x) + nrBytes(w)`.
	minSize: 10,
	// Which modules are to be considered
	modulePathPattern: /node_modules/
}
Based on what we’ve seen above, a new chunk will be created if all these conditions are met simultaneously:
- the module must belong to at least 3 chunks
- the minimum number of bytes of a chunk must be at least 10
- the modules that would lead to new chunks being created must come from the
node_modulesfolder
So, this is what a cache group looks like. From such cache groups there can be many chunks created. If, for example, the x module is required in 3 different chunks, it belongs to the node_modules folder and it has at least 10 bytes(the chunk that would be created would also have 10 bytes), then, based on the above cache group, x will be extracted into its own chunk. If there is another module from node_modules, w, which is required in 4 different chunks, then there will be another chunk for the w module, assuming all the other conditions described by the above cache group are fulfilled. If w was required in only 3 chunks, then it would be put in the same chunk as x. A StackBlitz app that covers this situation can be found here(make sure to follow the instructions listed in the readme file).
If SplitChunksPlugin is used with the default options,
/* ... */
optimization: {
  // splitChunks: false,
  splitChunks: {
    minSize: 0,
  },
},
/* ... */
or more specifically, without explicitly mentioning the cache groups, the plugin will use 2 implicit cache groups, which would be the same as if we explicitly declared them as follows:
/* ... */
optimization: {
  splitChunks: {
  	default: {
        idHint: "",
        reuseExistingChunk: true,
        minChunks: 2,
        priority: -20
    },
    defaultVendors: {
        idHint: "vendors",
        reuseExistingChunk: true,
        test: NODE_MODULES_REGEXP,
        priority: -10
    }
  },
},
/* ... */
Don’t worry about the new options, some of them will be covered later in the article. For now, it’s enough to understand what’s going on at a high level.
There are 2 cache groups - the default one, which targets any module from our application(i.e. doesn’t matter where it comes from); there is then the defaultVendors group which only targets the modules which come from node_modules(the test property implies that). As you probably noticed, the latter cache group has a greater priority and this plays an important role when a module belongs to multiple cache groups. Since we already know that a cache group is what produces new chunks, then a module would belong to multiple new chunks, which is not desirable because we would arrive to the same problem that we are trying to solve: code duplication. So, the priority option will help determine which unique chunk the module will belong to, while the other alternatives which the module could be part of are discarded.
In order to make these defaults cache groups a bit clearer, let’s see the chunks they create in an example we’ve seen in a previous section, namely the one where SplitChunksPlugin was introduced. Here is the link to its corresponding StackBlitz app.
The webpack configuration file looks like this:
{
  mode: 'production',
  entry: {
    main: './src',
  },
  output: {
    path: path.join(__dirname, 'dist'),
    filename: '[name].js',
    clean: true,
  },
  optimization: {
    // Instruct webpack not to obfuscate the resulting code
    minimize: false,
    splitChunks: {
      minSize: 0,
    },
  },
  context: __dirname,
};
A cache group inherits some options if they are not specified in the cache group itself. For example,
minSize: 0will be inherited by bothdefaultanddefaultVendorscache groups(the default cache groups). You can see the options a cache group can inherit here, in wepback’s types declaration file.
After running npm run build, let’s explore the output in the dist directory. In addition to the files we are already familiar with, namely the main and the async-* files(each file being associated with its chunk), new files appeared:
Although the generated files might have different names, their content won’t be different from what we will see next.
Of course, since a file from dist defines its own chunk, these new files indicate the presence of new chunks.
It’s no doubt that these new chunks were created by SplitChunksPlugin, but the question now is what modules are inside these chunks? Before inspecting what’s inside the files, here is the diagram which depicts the file structure and the chunks created by default(without the SplitChunksPlugin’s involvement):

A link for the above diagram can be found here.
We will use this diagram to understand why each new chunk has been created, so we will be referring to it often. Let’s start now going through each new file, starting from topmost file.
Here, once again, are the default cache groups, we will need them to understand why some modules are part of a certain chunk:
// The default cache groups that `SplitChunksPlugin` uses.
default: {
    idHint: "",
    reuseExistingChunk: true,
    minChunks: 2,
    priority: -20
},
defaultVendors: {
    idHint: "vendors",
    reuseExistingChunk: true,
    test: NODE_MODULES_REGEXP,
    priority: -10
}
For 571.js we have:
/* ... */
const __WEBPACK_DEFAULT_EXPORT__ = ('z');
/* ... */
so here we have the z module. Why is that, though? Well, z belongs to the node_modules folder(as observed from the above screenshot) and thus the targeted chunk group is defaultVendors which doesn’t impose any constraints on the number of chunks the module must appear in. In this case, z belongs only to the async-c chunk and this is acceptable for defaultVendors. It is true that z could belong to the other cache group, default, but defaultVendors has a greater priority, so z will belong to the latter.
For 616.js:
/* ... */
const __WEBPACK_DEFAULT_EXPORT__ = ('y');
/* ... */
this is the y module. It gets placed in a different chunk because it is belongs to the node_modules folder(so defaultVendors is once more accountable for the newly created chunk) and it appears in the async-b and async-a chunks.
For 673.js:
/* ... */
const __WEBPACK_DEFAULT_EXPORT__ = ('d');
/* ... */
this is the d module. As seen from the screenshot, it does not comes from node_modules. It means the default cache group is responsible for creating this chunk. If we take closer look at the diagram, we will see that it is requested from async-a, async-b, async-c chunks. This means 3 chunks, and the default cache groups says that the minimum number of chunks a module must appear in should be at least 2. This condition is met, so that’s why this module is put into a separate chunk.
For 714.js:
/* ... */
const __WEBPACK_DEFAULT_EXPORT__ = ('f');
/* ... */
this is the f module. As can be noticed from the diagram, f belong to 3 chunks: async-g, async-b and async-c. Judging by the screenshot, the f module does not comes from node_modules, so it’s the same case as above, meaning that this chunk has been created due to the default cache group.
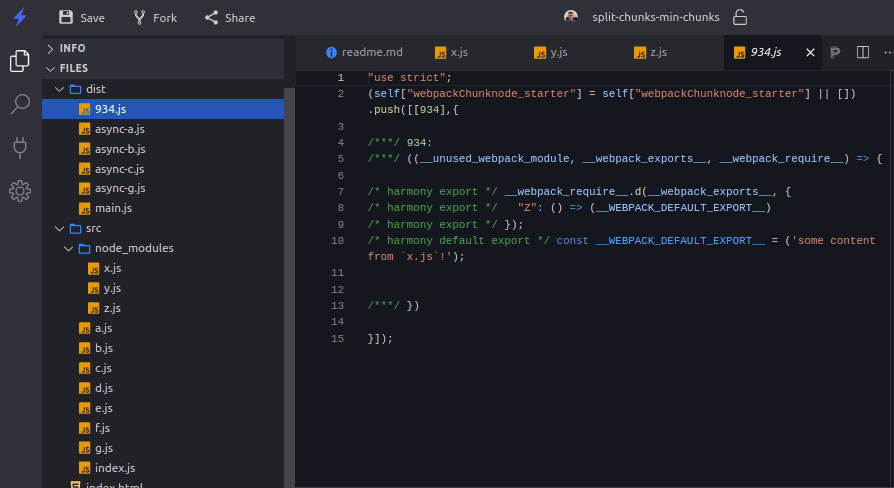
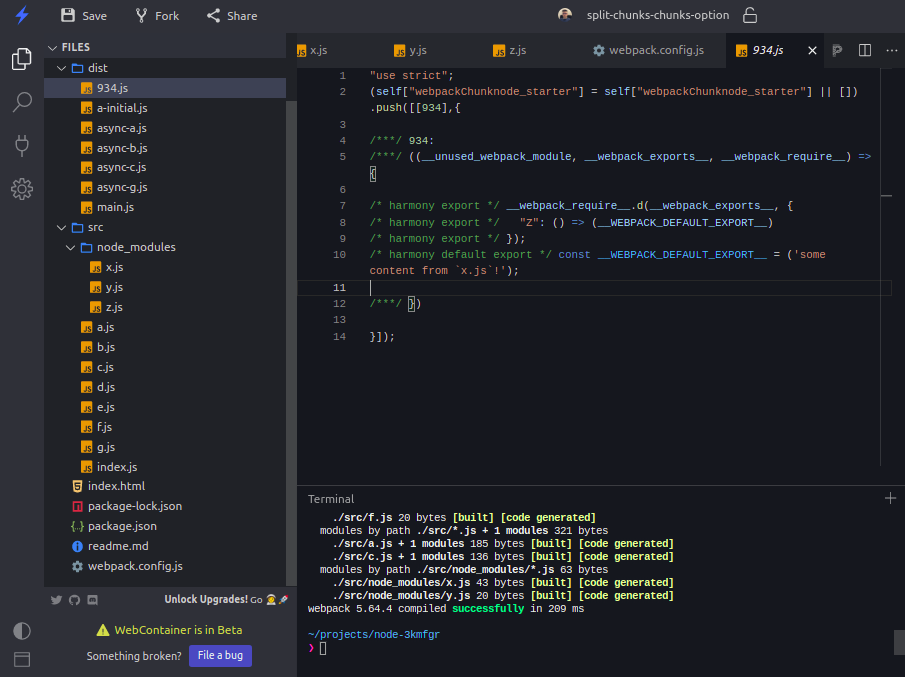
And finally, for 934.js:
/* ... */
const __WEBPACK_DEFAULT_EXPORT__ = ('some content from `x.js`!');
/* ... */
as expected, this is the x module. You might have guess it why it gets placed in a new chunk, since we’ve talked about it a few times throughout the article: it’s from node_modules(so defaultVendors created this new chunk). Additionally, it is requested from 3 chunks, but this would matter only if we explicitly used the minChunks option in the defaultVendors cache group.
So, these are effects of using the default options of SplitChunksPlugin. By the way, if you are interested to see how cache groups are compared in order to determine which one should be used to create new chunks, here’s the source code that does that.
It was necessary to spend some time on comprehending how the default cache groups work, otherwise it would be though and challenging to control them in order to help SplitChunksPlugin achieve the results we are looking for. This also serves as a base for investigating some of the SplitChunksPlugin’s options that we have at our disposal.
But before we do that, let’s quickly see how we can disable a cache group, since we will apply this idea in the following sections, in order to make things a bit easier to grasp. To illustrate, we will disable the default cache group.
/* ... */
optimization: {
    splitChunks: {
        cacheGroups: {
        	// We're disabling it by setting it to false.
        	default: false,
        },
        minSize: 0,
  },
}
/* ... */
You can run this project which includes the above configuration in this StackBlitz app.
If we were now to run npm run build, what would you expected the newly generated chunks to be? Well, if the default cache group is disabled, then only modules from node_modules are taken into account. And since there are no other constraints, apart from minSize(without it we wouldn’t be seeing any newly generated chunks since the files are too small compared to the minSize’s default value), then, based on what we’ve learned in this section, the dist directory should contain 3 newly generated chunks, one for each of the x, y and z modules:

In the upcoming sections, we will explore some of the SplitChunksPlugin’s capabilities. For the sake of simplifying things, each example that we’ll see will have one of the default cache groups disabled, so that we can focus on what that example is trying to emphasize. Let’s get into it!
The minChunks option
We have already encountered this property through the article: it indicates the minimum number of chunks that must require a module. Let’s recall that in order for new chunks to be created by SplitChunksPlugin, they must fulfil a collection of requirements. That is to say, the chunk must belong to a certain cache group.
To make things a bit easier to understand, let’s take an example where we want these conditions to be met:
- the module that the new chunks will contain must come from
node_modules - the module must appear in at least 3 chunks
With these restrictions in mind, this is how the webpack configuration would look like:
optimization: {
    // Instruct webpack not to obfuscate the resulting code
    minimize: false,
    splitChunks: {
      // minSize: 0,
      // minChunks: 3,
      cacheGroups: {
        // Disabling this group so that we can focus on one thing at a time.
        default: false,
        defaultVendors: {
          // We could have also set this property as: `splitChunks.minSize: 0`,
          // since this property is inherited(by default) by the cache groups.
          minSize: 0,

          // Enforcing the minimum number of chunks that request a module.
          minChunks: 3,

          // Q: What kind of modules should new chunks contain?
          // A: Modules that come from `node_modules`
          test: /node_modules/,
        },
      },
    },
  },
A StackBlitz demo that exemplifies this option can be found here.
What would be the contents of dist after running npm run build ? Apart from the chunks we’re already familiar with(main and async-*), there is only a new chunk and it contains the x module. Based on the first diagram that we saw earlier(whose link can be found here), this is the only module that comes from node_modules and is present in at least 3 chunks:
What would be the output if we set minChunks: 2? Since this change basically says that the minimum number of chunks should now be 2 instead of 3, then we should see 2 chunks: one which contains the x module and one which contains the y module. Feel free to try that in the StackBlitz app!
The chunks option
We’ve heard a few times phrases like module x appears in N different chunks. With the help of the chunks option we can specify the types of those chunks. We didn’t talk much about chunks and other adjacent concepts until this point, so we will review some of these ideas now. For this reason, we will have to check the initial diagram again:
A link for the above diagram can be found here.
Apart from the fact that a chunk contains more modules, the concept of a chunk could be hard to picture. With these bits of information that we have, we can deduce 2 types of chunks from the diagram(the chunks are framed in green):
- the async chunks: it’s about the
async-*chunks; what do these chunks have in common? - they are all created as a result of using theimport()function - the initial/main chunks: only one chunk from the above diagram fits into this category - the
mainchunk; what exactly is a main chunk? - it, like any other types of chunks, contains modules that are to be rendered and used in the application, but this kind of chunk also contains a lot of so-called runtime code; this is the code that ties together all the generated chunks so that our application can work properly; for example, the runtime code contains the logic for loading the async chunks and integrate them within the application; usually, this kind of chunks(initial chunks) can be recognised when defining items in theentryobject(e.g.{ entry: { main: './index.js' } })
Now coming back to the chunks option, it accepts 4 values:
async- only the async chunks will be taken into account by the cache group in question(this is the default behaviour); so, not only can we specify the number of chunks a module must be part of, but also the chunk’s typeinitial- only the initial/main chunks are taken into accountall- any chunk- a predicate function that will determine which chunk will be considered; here we can filter out chunks by using many of the chunk’s properties: its name, its constituent modules etc.
It is worthwhile to underline the connection between the chunks option and minChunks. We use the chunks option in order to filter out certain chunks and then SplitChunksPlugin checks the number of remaining chunks against minChunks. To give an example, here’s a StackBlitz project which has the following structure:
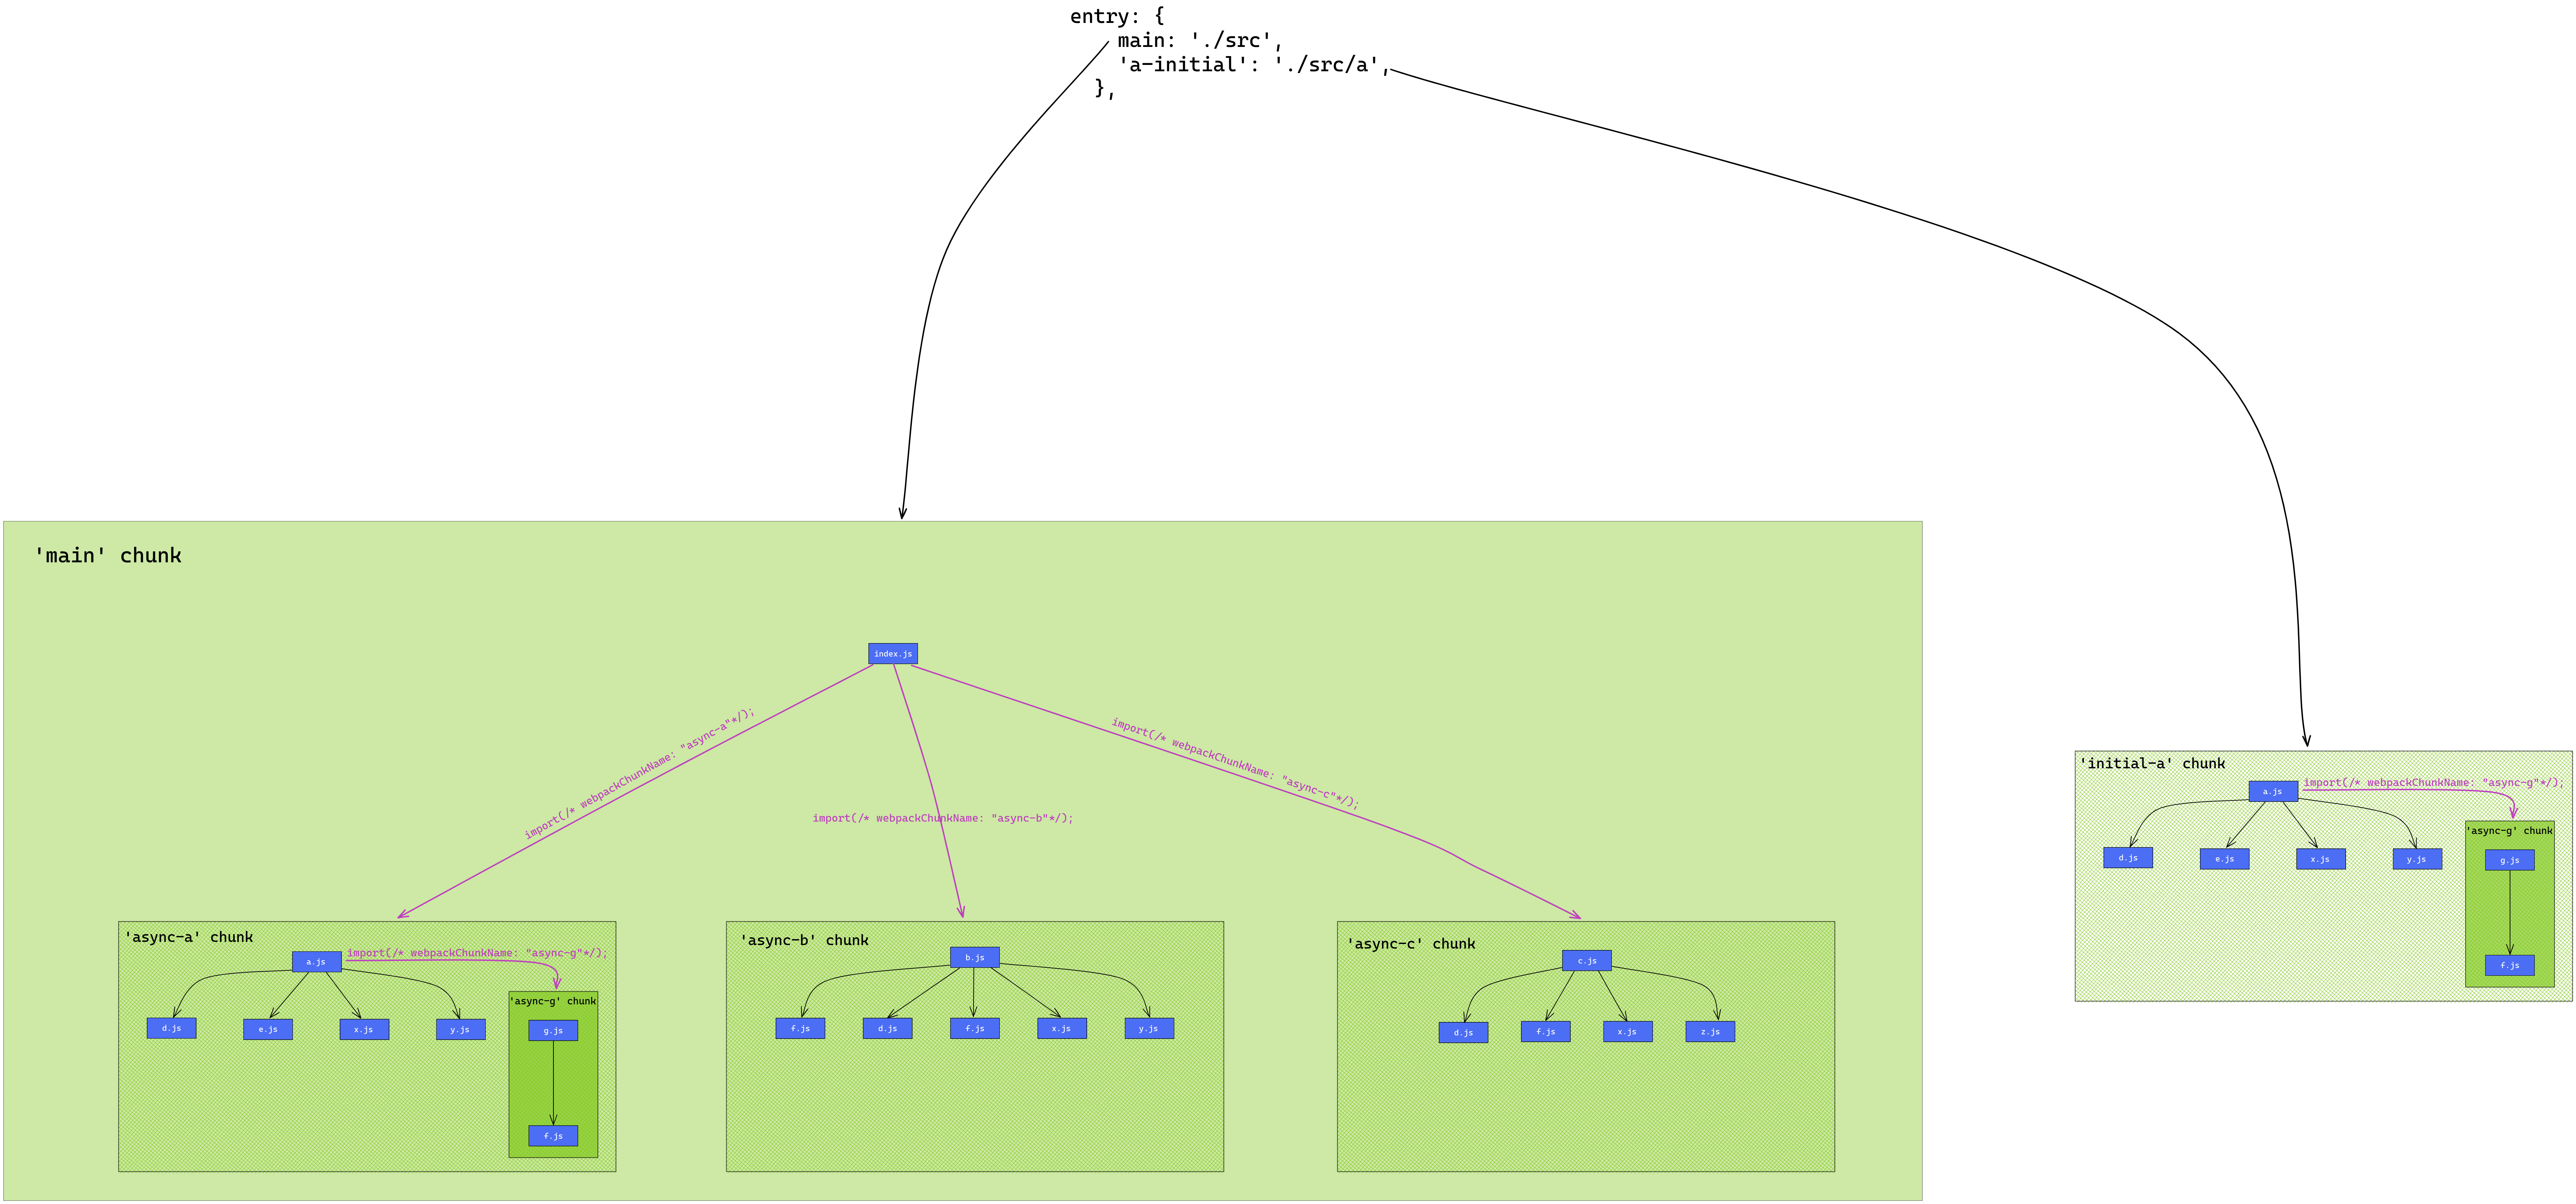
A link for the above diagram can be found here.
As noticed from the diagram, we have a new main chunk: a-initial. This chunk corresponds to the a-initial item in the entry object from the configuration file. As a result, the x module will be request from one more chunk.
Let’s try to solve this problem: we want new chunks to be created only if their constituent modules are required in at least 4 other chunks, regardless of whether the chunk is async or not(basically we’re considering all chunks). Here’s a way to configure SplitChunksPlugin so that we can achieve the desired result:
optimization: {
  // Instruct webpack not to obfuscate the resulting code
  minimize: false,
  splitChunks: {
    minSize: 0,
    chunks: 'all',
    minChunks: 4,
    cacheGroups: {
      // Disabling this cache group.
      default: false,
    },
  },
},
Notice that with chunks: 'all' we are essentially saying this to SplitChunksPlugin: please consider any chunk that requires a module, doesn’t matter whether it’s async or initial or of any other type.
Once npm run build is invoked, we should see only one new chunk generated which unsurprisingly contains only the module x:
We will end this section with a few small tasks that aim to clarify this option even more.
What follows is based on the above diagram that depicts the chunks and their modules. It is recommended to try out the following configurations in the StackBlitz app that has been provided earlier.
Do you find anything wrong with the below configuration? (aiming at the chunk and minChunks duo)
optimization: {
  minimize: false,
  splitChunks: {
    minSize: 0,
    chunks: 'async',
    minChunks: 4,
    cacheGroups: {
      // Disabling this cache group.
      default: false,
    },
  },
},
The problem is that there is no module that appears in 4 async chunks - so we will end up only with duplicated code, since no separate chunks have been created! The closest it gets to is 3 and we’re talking about the x module here. In order to properly extract the x’s code into a new chunk, we will have to change minChunks: 4 to minChunks: 3(feel free to try this out in the StackBlitz project).
What about the next configuration? What are we asking webpack to do here?
optimization: {
  minimize: false,
  splitChunks: {
    minSize: 0,
    chunks: 'initial',
    minChunks: 4,
    cacheGroups: {
      // Disabling this cache group.
      default: false,
    },
  },
},
We’re telling webpack to split chunks(i.e. create new chunks) only if they contain modules which come node_modules(hence the defaultVendors group) and which appear in at least 4 initial chunks. In our case, there is only one initial chunk that requires such modules: the a-initial chunk which requires the modules x and z(there is also the main chunk, but it only requires modules via the import() function). So, the correction here would be to change minChunks: 4 to minChunks: 1.
In this section there were a bunch of new concepts we’ve learned about and the beautiful thing about it is that they will be of use in the following articles, where we will explore other configuration options for this plugin.
Conclusion
Although this learning journey probably turned out to be not so easy, I hope the effort was worth it.
To quickly recap one of the problem this plugin solves: code duplication - a module is copied in multiple chunks and this sometimes can be expensive, especially when the module is at least a few hundreds lines of code. A solution to this problem is centralise these kinds of modules, so that they can be reused by multiple consumers. This can be achieved by placing the module in question in a separate chunk which will be loaded(fetched over the network as an HTTP request) only once.
Now a question arises: what are the criteria based on which these separate chunks are created? - here is where SplitChunksPlugin comes into play - it decides on how to properly organise into chunks the modules which are very frequently used in multiple places.
Thanks for reading!
The diagrams have been made with Excalidraw.
Special thanks Max Koretskyi for reviewing this article and for providing extremely valuable feedback.